
Tired of bulky light fixtures hanging from your ceiling? Canless recessed lighting offers a sleek, modern solution that’s surprisingly easy to install. Unlike traditional can lights that require bulky metal housings, these slim fixtures take up minimal space and deliver brilliant illumination.
Here’s what you’ll learn: Installing canless recessed lights takes 30-60 minutes per fixture, requires basic electrical knowledge, and costs 40-60% less than traditional can installations. With the right preparation, most homeowners can complete this project in a weekend.

Understanding Canless Recessed Lighting
What Are Canless Lights?
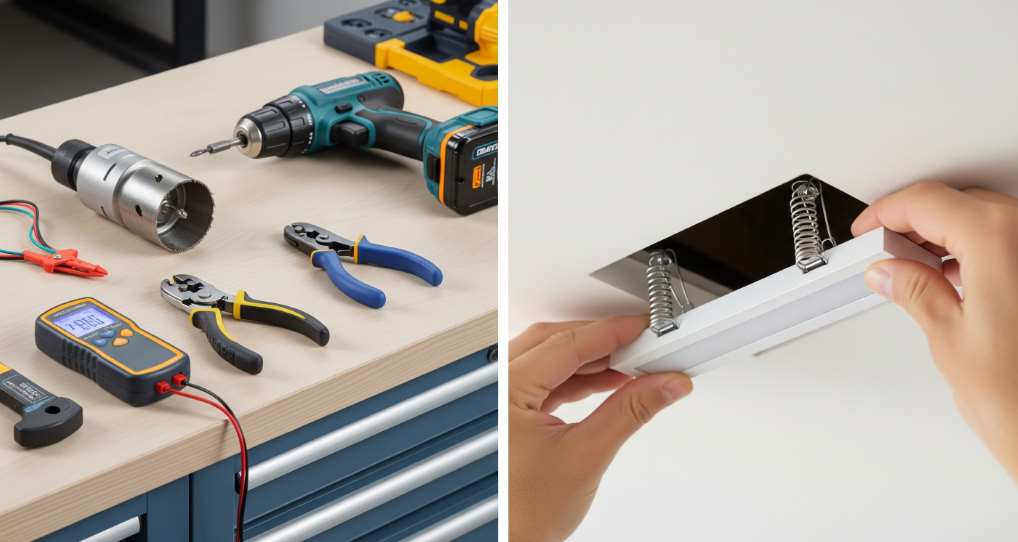
Canless recessed lighting eliminates the need for a separate housing by integrating all components directly into the fixture. These ultra-thin LED units, also called wafer lights or slim downlights, mount directly to your ceiling drywall using spring clips.
The entire fixture measures just 1-2 inches thick, making it perfect for tight spaces where traditional 5-7 inch cans won’t fit. Each unit includes an integrated LED light source, driver, and junction box—everything arrives in one compact package.
At Lehmann Electrical & Design, we’ve installed over 5,000 canless fixtures in Milwaukee homes. We’ve found that proper junction box placement reduces installation time by 50%, making these fixtures ideal for both professionals and DIY enthusiasts.
Benefits Over Traditional Can Lights
Canless recessed lights have a more straightforward installation process compared to traditional fixtures. You don’t need to worry about fitting bulky housings between joists or dealing with complex mounting brackets.
Canless recessed lights are generally more energy-efficient, especially when integrated with LED technology. They consume 80% less power than halogen alternatives while lasting 50,000+ hours—that’s over 20 years of typical use.
The slim profile means you can install them in spaces with just 2 inches of clearance. This opens up possibilities in basements with low ceilings, under stairs, or anywhere traditional cans simply won’t fit.
Tools and Materials You’ll Need
Essential Tools
Having the right tools and materials is crucial for a smooth installation. Here’s your complete checklist:
Required Tools:
- Voltage tester (non-contact type preferred)
- Hole saw (4″ or 6″, depending on fixture size)
- Drill with bits
- Wire strippers
- Needle-nose pliers
- Screwdriver set
- Stud finder
- Measuring tape
- Pencil for marking
Safety Equipment:
- Safety glasses
- Work gloves
- Sturdy ladder
Required Materials
Before starting, gather these materials based on your project size:
- Canless LED fixtures (calculate 1 per 25-35 square feet)
- 14-2 or 12-2 NM-B cable (Romex)
- Wire nuts (usually included with fixtures)
- Electrical tape
- Cable clamps
- Junction boxes, if not included
For installations involving insulation, use IC-rated fixtures designed for direct insulation contact. This prevents overheating and meets electrical code requirements.
Planning Your Installation
Determining Light Placement
Proper spacing makes the difference between professional results and amateur-looking installations. A good rule of thumb is to space the lights evenly to avoid dark spots.
Start by dividing your room length and width by the number of lights. For a 12×12 room with 4 lights, place them 6 feet apart and 3 feet from the walls. This creates uniform coverage without shadows or bright spots.
Our Recessed Lighting Installation experience shows that keeping fixtures 4 feet from walls provides 30% better light distribution than closer placement.
Calculating Circuit Load
All lighting must be on either a 15-amp or 20-amp circuit. Most canless LED fixtures draw 10-15 watts each, allowing 10-12 lights on a single 15-amp circuit.
Calculate your load: multiply fixture wattage by quantity, then divide by 120 volts. For ten 12-watt fixtures: (10 × 12) ÷ 120 = 1 amp—well within safe limits for a 15-amp circuit.
Step-by-Step Installation Process
Step 1: Turn Off Power
Safety comes first—always. Switch off the circuit breaker controlling your work area. Use a voltage tester to confirm power is off. Test the tester on a known live circuit first to ensure it’s working properly.
Place tape over the breaker switch and post a note warning others not to turn it on. This prevents accidents if someone else enters your electrical panel.
Step 2: Mark and Cut Ceiling Holes
Use your measurements to mark fixture locations with a pencil. Check each spot with a stud finder—you want to avoid joists, pipes, and existing wires.
Cut holes using the appropriate hole saw (usually 4.25″ for 4″ fixtures or 6.25″ for 6″ fixtures). Apply steady, gentle pressure to create clean edges. Wear safety glasses as drywall dust will fall.
Step 3: Run Electrical Cable
Running cable depends on your situation:
From existing switch: Fish 14-2 or 12-2 cable from your switch box to the first fixture location. Continue daisy-chaining to each subsequent light location.
New circuit: Run cable from your electrical panel to a new switch location, then to fixtures. This requires more advanced knowledge—consider hiring a Lighting Contractor for new circuits.
Leave 12-16 inches of cable at each hole for making connections. Secure cable to joists every 4.5 feet using cable staples.
Step 4: Install Junction Boxes
Use the listed junction boxes with proper covers to house wiring connections. Many canless fixtures include attached junction boxes, simplifying this step.
Place the junction box in the ceiling first, then insert the fixture. If your fixture has a separate box, mount it within 6 inches of the hole, accessible for future maintenance.
Strip 6 inches of outer cable sheathing and 3/4 inch from individual wires. This provides enough length for secure connections.
Step 5: Make Wire Connections
Connect wires using the included wire nuts:
- Black to black (hot)
- White to white (neutral)
- Green or bare copper to ground
Twist wires clockwise before applying wire nuts. Tug gently to ensure secure connections. Wrap electrical tape around each wire nut for extra security.
For multiple lights, connect the incoming power to the first fixture, then run cable from that junction box to the next fixture, creating a daisy chain.
Step 6: Insert and Secure Fixtures
Wafer-style canless LED lights have spring tabs that will lie flat on the interior surface of the ceiling and hold the fixture snug. Hold the spring clips up against the fixture body while inserting them through the hole.
Once pushed through, the springs snap out, pulling the fixture tight against the ceiling. The slim trim ring should sit flush with minimal gap. If gaps appear, check that springs are properly deployed.
Common Mistakes to Avoid
In our 20 years of serving Milwaukee through Electrical Services Milwaukee, we’ve seen these mistakes repeatedly:
Overloading circuits: Calculate total wattage before installation. Adding too many lights trips breakers and violates code.
Wrong hole size: Measure twice, cut once. Holes too large leave ugly gaps; too small damage fixtures during installation.
Ignoring insulation ratings: A recessed luminaire that is not identified for contact with insulation should have all recessed parts spaced at least ½ inch from combustible materials. Always use IC-rated fixtures near insulation.
Skipping permits: Many jurisdictions require permits for electrical work. Check local requirements to avoid fines and ensure insurance coverage.
Testing and Final Adjustments
After installing all fixtures, restore power at the breaker. Test each light individually before installing trim pieces. If the lights don’t work:
- Recheck all wire connections
- Verify power at the switch
- Test fixtures with a voltage meter
- Ensure compatible dimmer switches for LED fixtures
Adjust spring clips if fixtures appear crooked. Most quality canless lights include adjustment mechanisms for perfect alignment.
When to Call a Professional
While canless light installation is DIY-friendly, certain situations require professional expertise:
- Adding new circuits from the electrical panel
- Working in ceilings with aluminum wiring
- Installing in shower areas (requires special-rated fixtures)
- Dealing with knob-and-tube or outdated wiring
- When local codes require a licensed electrician for installation
Our installation data shows that homeowners save an average of 2 hours per room when switching from can to canless fixtures. However, electrical work carries serious risks. When in doubt, consult professionals.
Conclusion
Installing canless recessed lighting transforms any room with clean, modern illumination. These fixtures offer easier installation, better energy efficiency, and sleeker profiles than traditional can lights. With proper planning and basic electrical knowledge, most homeowners can complete the installation in a weekend.
Remember: safety always comes first. Turn off the power, use proper tools, and don’t hesitate to call professionals for complex situations. The small investment in professional installation beats the cost of electrical fires or code violations.
Ready to upgrade your lighting? Contact Lehmann Electrical & Design for expert installation or guidance on your DIY project. We’ll help you achieve professional results safely and efficiently.
FAQ: How to Install Canless Recessed Lighting
Can I install canless recessed lights myself?
Yes, if you have basic electrical knowledge and your local codes permit DIY electrical work. The installation is simpler than traditional can lights, typically taking 30-60 minutes per fixture.
Do canless recessed lights need a junction box?
Yes, install a junction box to connect incoming switch wires and outgoing cables safely. Many canless fixtures include integrated junction boxes for convenience.
How many canless lights can I put on one switch?
Typically, 10-12 LED canless lights work on a single 15-amp circuit. Calculate the exact capacity by dividing the circuit amperage by the total fixture wattage.
Are canless recessed lights good?
Absolutely. They’re energy-efficient, last 50,000+ hours, install more easily than traditional cans, and work in tight spaces with just 2 inches of clearance.
What’s the difference between can and canless lights?
Traditional can lights require separate metal housings installed between joists. Canless lights integrate everything into one slim fixture that mounts directly to drywall using spring clips.